This article contains affiliate links. We may earn a commission at no extra cost to you. See our disclosure.

How to Fit a Hiking Backpack: The Short Version
Most pack fit problems trace back to two errors: measuring the wrong thing, and adjusting straps in the wrong order. You don't fit a pack to your height. You fit it to your torso length, then to your hip circumference. Everything else – shoulder straps, load lifters, sternum strap – comes after those two numbers are confirmed and the hipbelt is seated correctly.
According to REI's expert advice guide, the correct adjustment sequence is: hipbelt first, then shoulder straps, then load lifters, then sternum strap. Doing it out of order is the single most common cause of the 'shoulders aching by mile 8' problem this audience knows well. Load a pack to 20–25 lbs before fitting it – an empty pack adjusts completely differently than a loaded one.
Step 1: Measure Your Torso Length (Not Your Height)
Torso length is the distance from your C7 vertebra – the prominent bony bump at the base of your neck – down to your iliac crest, which is the top ridge of your hip bones. Per REI's fitting guide, this measurement, not your overall height, determines which pack size you need. Two people who are 5'10" can have torso lengths that differ by three inches, which puts them in entirely different pack size categories.
To measure accurately: stand upright, tilt your head slightly forward to find the C7 bump, and have a friend run a flexible tape measure from that point straight down your spine to the top of your hip bones (place your hands on your hips to locate the iliac crest). ULA Equipment's fitting guide notes that a pack too short for your torso will drag on your shoulders, while a pack too long will cause the shoulder straps to ride up above the shoulders and produce an unstable, bouncy carry. Most brands offer S/M and M/L sizes covering roughly 16–21 inch torso ranges, so getting this measurement right is non-negotiable.
What 'Universal Sizing' Actually Means
Some packs – like the Deuter Aircontact Core 65+10 – ship in a single torso size covering 18–21 inches. That's not universal; it's a 3-inch window that excludes a significant portion of hikers on both ends of the range. OutdoorGearLab notes this as a real limitation for the Deuter. Brands that offer four torso sizes – like the REI Flash 55 – are genuinely more inclusive. When a retailer or product page says 'one size fits most,' check the torso range in the specs and compare it to your measurement before ordering.
Step 2: Fit the Hipbelt First
The hipbelt is where load transfer actually happens. A properly fitted hipbelt sits centered on the iliac crest – not above it on the waist, and not below it on the upper thigh. ULA Equipment specifies that there should be 4–8 inches of space between the belt wings to allow room for the webbing adjustment. If the belt wraps past that range and the buckle sits near your belly button, the pack is too small in the hip. If the wings don't reach close together at the front, it's too large.
For hipbelt sizing, ULA Equipment's guide gives a practical formula: for men, hip belt size equals your pant waist measurement plus 2 inches. For women with curvier hips, it's waist plus 5 inches; for straighter hip profiles, waist plus 3 inches. These aren't aesthetic distinctions – they determine whether the belt actually seats on the iliac crest and does the structural work of transferring load off your shoulders.
Once the hipbelt is cinched down onto the iliac crest, pull the shoulder straps back and downward until they contact your shoulders without gaps. The straps should curve over and slightly below the top of your shoulder – not dig in from above. At this point, the pack should already feel meaningfully lighter because the hipbelt is now doing the structural work instead of your shoulders.
Load Lifters and the 45-Degree Rule
Load lifters are the short adjustment straps that run from the top of the shoulder strap to the top of the pack frame. REI's guide specifies they should form roughly a 45-degree angle from the shoulder to the pack. Too slack and the top of the pack pulls away from your upper back, throwing the center of gravity rearward. Too tight and they create a pressure ridge across the top of your shoulder. Get them wrong and a well-fitted pack will still produce the same 'shoulders destroyed by mile 8' carry that plagues budget packs with no adjustment range at all.
The sternum strap comes last and does the least structural work of any adjustment. It prevents the shoulder straps from sliding off laterally on uneven terrain – that's it. Overtightening it compresses your chest and restricts breathing. Position it an inch or two below your collarbone and leave it with slight give.

When the Pack's Fit System Is Working Against You
A pack can be correctly adjusted and still produce a rough carry if the fit system itself fails at your body type or load range. These are the failure points that adjustment alone won't fix.
The Hipbelt Slides Up Under Load
If the hipbelt migrates upward onto your waist within the first mile, the belt is failing at load transfer. This usually means the belt shape doesn't match your hip profile, the torso length is too short for your body (so the pack sits too high and levers the belt upward), or the stiffness of the belt itself is inadequate for the load. OutdoorGearLab flagged the Osprey Aether 65's hipbelt for allowing lateral sway under heavy loads – a different failure mode but the same root problem: the belt stops doing its job under stress. A belt that drifts is a belt that has handed the load back to your shoulders.
Shoulder Straps That Gap at the Top
If you can slide a hand between the top of your shoulder and the strap, the torso length is too long or the straps are designed for a broader shoulder profile than yours. This is a primary fit problem for women using men's or unisex packs. According to Alpenglow Sports, women generally have narrower shoulders that require straps positioned closer together – a dimension that most unisex pack designs don't account for. When straps gap at the top, the load hangs forward instead of transferring cleanly into the frame, and no amount of load-lifter adjustment will compensate.
The Frame Doesn't Transfer Load to Your Hips at All
OutdoorGearLab's testing of the Teton Sports 55L Scout found that the frame fails to transfer weight to the hipbelt effectively, leaving testers' shoulders sore after hours with heavy loads. OGL's testers noted that 'after a few hours with heavy loads, you can appreciate the value of higher-end suspension designs.' This is a structural limitation of the pack's frame, not a fit error – and it can't be adjusted away. Budget packs at this price point are acceptable for loads under 20 lbs on day outings, but they fail at multi-day loads because the frame architecture simply isn't built to do what a premium suspension system does.
Women's-Specific Fit: Why It's an Engineering Difference, Not a Color Option
Women's-specific packs differ from unisex designs in three structural ways: shoulder strap placement (closer together to match narrower shoulder width), hipbelt curvature (shaped to match proportionally wider hips relative to waist), and back length (women's torsos are often shorter relative to height). REI's guide explicitly notes these distinctions – it's not a marketing segmentation, it's a biomechanical one.
The hipbelt curvature issue is the most consequential. Women's hips are typically proportionally wider relative to the waist than men's, so a unisex hipbelt – designed around a straighter male hip profile – frequently fails to seat on the iliac crest correctly. Instead of wrapping around the hip and locking in, it sits across the hip at the wrong angle. The result is that load transfers back to the shoulders regardless of how carefully you've cinched the belt. Alpenglow Sports identifies this as the core reason women often feel that a pack that 'fits' on the torso chart still carries uncomfortably.
Packs like the Osprey Eja 58L (the women's counterpart to the Exos) account for significant sales volume but are regularly treated as afterthoughts in roundups. The engineering differences are real and directly impact load transfer mechanics. If you've tried a unisex pack that felt wrong despite correct torso sizing, the hipbelt shape is the first place to investigate – not the shoulder straps.
How Pack Weight Affects Fit and Load Transfer
Pack weight itself is a fit variable. REI's backpacking weight guide sets the standard guideline that a loaded pack should not exceed 20% of your body weight. Beyond that threshold, even a correctly fitted pack with a good suspension system will struggle to distribute load comfortably over a full day. For a 150-lb hiker, that's a 30-lb ceiling – and it includes the pack's own weight.
This is why pack weight matters in the fit equation: a 5.2-lb pack like the Deuter Aircontact Core 65+10 starts every trip with more than 5 lbs already counted against your weight budget before you've added food, water, or gear. The Granite Gear Blaze 60 at 3.0 lbs saves 2.2 lbs on the same trip – and OutdoorGearLab confirms it still handles loads up to 50 lbs, a statistic that surprises most beginners who assume lighter packs have lower load limits.
Suspension quality also determines the effective load ceiling for comfortable carry. The Osprey Atmos AG LT 65 uses a suspended mesh back panel that wraps onto the hipbelt, spreading load across both the torso and hips simultaneously. GearX explains this creates an anchoring effect that 'hugs the pack around the user's hips' rather than simply resting on them. The result is that even a correctly-fitted standard pack will feel rougher under the same load compared to a pack with an active suspension system.
Packs That Demonstrate Good Fit Systems
The following packs represent different points on the fit-system spectrum, from premium suspension engineering to budget designs where the frame's structural limits are part of what you're evaluating.

Osprey Atmos AG LT 65
Amazon / REI
- Access:
- Top, side
- Capacity:
- 65L
- Back Panel:
- Suspended mesh (Anti-Gravity)
- Frame Type:
- Internal
- Organization:
- Lid, front mesh pocket, side water bottle pockets, hip belt pockets
- Measured Weight:
- 4.2 lbs
What we like
- Rated #1 overall by OutdoorGearLab across hundreds of trips – testers describe it as 'feels like the pack is giving me a hug'
- Suspended mesh back panel wraps onto hip belt for unmatched ventilation and load transfer
- Half a pound lighter than standard Atmos AG 65 while retaining full feature set
- Stellar adjustability with hip belt that hugs hips even when waist belt isn't fully cinched
Worth knowing
- Heavier than dedicated ultralight packs like Granite Gear Blaze or ULA Catalyst
- Not as streamlined as minimalist packs for ultralighters
- Premium price point at $320+
The Osprey Atmos AG LT 65 is the clearest example of a suspension system doing real load-transfer work. The Anti-Gravity mesh runs continuously from the shoulders down and wraps around onto the hipbelt, which means the hipbelt and back panel move as a single system. OutdoorGearLab rated it their #1 overall pack – testers described it as feeling like 'the pack is giving me a hug.' It's also half a pound lighter than the standard Atmos AG 65, which matters when you're counting against that 20% body weight ceiling.

Granite Gear Blaze 60
Amazon
- Access:
- Top, front
- Capacity:
- 60L
- Back Panel:
- Breathable with front access zipper
- Organization:
- Lid, front mesh pocket, side water bottle pockets, hip belt pockets
- Measured Weight:
- 3.0 lbs
- Weight Per Liter:
- 0.80 oz/L
What we like
- Weighs only 3.0 lbs and supports up to 50 lbs – best weight-to-capacity ratio in its class per OutdoorGearLab
- Brain and hip belt are removable and combine into a fanny pack for day hikes
- Nine compression straps handle variable load sizes effectively
- Stretchy mesh front pocket, roomy hip belt pockets praised by OGL testers
- Praised in r/ultralight for long-term PCT durability (tested 2019)
Worth knowing
- Small buckles are hard to operate with gloves in cold weather
- Not as comfortable as suspended mesh panels like the Osprey Atmos AG LT
- Simpler design lacks the adjustability of higher-end packs
The Granite Gear Blaze 60 at 3.0 lbs makes a different set of fit tradeoffs. The suspension is simpler than the Osprey AG system, but it still supports loads up to 50 lbs – a combination that OutdoorGearLab calls the best weight-to-volume ratio in its class. The removable brain (lid) and hipbelt that combine into a fanny pack for day hikes gives it versatility the Atmos lacks. Hikers in r/ultralight have praised it for long-term PCT durability. The tradeoff: smaller buckles that are hard to operate with gloves, which matters in cold weather when you need to re-adjust on the fly.
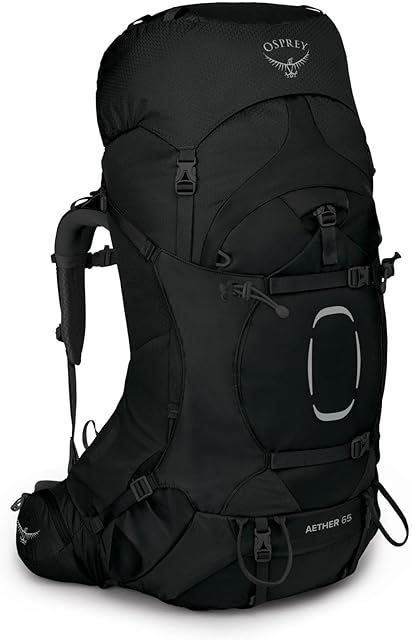
Osprey Aether 65
Amazon
- Access:
- Top, front, bottom
- Capacity:
- 65L
- Organization:
- Lid, front pocket, side water bottle pockets, hip belt pockets
- Measured Weight:
- 5.0 lbs
- Weight Per Liter:
- 1.23 oz/L
- Max Comfortable Load:
- 50 lbs
What we like
- Handles loads up to 50 lbs more comfortably than any other pack tested by OutdoorGearLab
- Back panel and shoulder straps remain firm and supportive under extreme weight
- Rain cover included in the box
- Easily adjustable on trail with reinforced stretch front pocket and double-pocketed lid
- 4.6 stars across 471 Amazon reviews demonstrates broad user satisfaction
Worth knowing
- Weighs 5.0 lbs – one of the heaviest packs in the category
- Hip belt allows some lateral sway under heavy loads
- Not ideal for hikers who prioritize speed and low base weight
The Osprey Aether 65 is the load-haul option here. OutdoorGearLab found it handles loads up to 50 lbs more comfortably than any other pack they tested. The back panel and shoulder straps stay firm under extreme weight where lighter packs start to flex. At 5.0 lbs, it's one of the heavier options in the category, and the hipbelt does allow some lateral sway under heavy loads – a fit system limitation that doesn't appear until you're actually loaded at its upper range.

Deuter Aircontact Core 65+10
Amazon
- Access:
- Top, front, bottom
- Capacity:
- 65L + 10L expandable
- Torso Range:
- 18–21 inches (one size)
- Organization:
- Lid with two zippered pockets, front mesh pocket, side water bottle pockets, hip belt pockets, sleeping bag compartment
- Measured Weight:
- 5.2 lbs
- Weight Per Liter:
- 1.11 oz/L
What we like
- Best organizational features of any pack tested – three separate access points to main compartment
- Sleeping bag compartment can be merged with main compartment via internal zipper
- Two removable/reconfigurable side compression straps per side
- Generously cushioned shoulder straps, lumbar pad, and hip belt for all-day comfort
Worth knowing
- Only available in one torso size (18–21 inches) – excludes many body types
- Weighs 5.2 lbs – heaviest pack in the OutdoorGearLab test group
- Only one side water bottle pocket with forward-angle access; left side has none
- Very limited Amazon review volume (12 reviews) makes quality assessment difficult
The Deuter Aircontact Core 65+10 has the most organizational access points of any pack OutdoorGearLab tested, and its padding is genuinely generous across the shoulder straps, lumbar pad, and hipbelt. The fit system limitation is blunt: one torso size covering 18–21 inches. If you measure outside that range, this pack fails at your body before you've buckled it. At 5.2 lbs it's also the heaviest pack in the OGL test group, which compounds against the 20% body weight guideline.

Teton Sports 55L Scout
Amazon
- Access:
- Top, bottom
- Capacity:
- 55L
- Frame Type:
- Internal
- Organization:
- Lid with interior and exterior pockets, zippered side pockets, hip belt pockets, sleeping bag compartment
- Measured Weight:
- 4.5 lbs
- Weight Per Liter:
- 1.30 oz/L
What we like
- Under $100 price point makes it the most accessible backpacking pack available
- Durable fabric that performs better than other similarly priced budget packs per OGL testing
- Amazon Choice badge with 7,800+ reviews signals mass-market reliability
- Good starting pack for first-timers to test if backpacking suits them before investing more
Worth knowing
- Left testers' shoulders sore after heavy loads – frame doesn't transfer weight to hip belt well
- Weighs 4.5 lbs – heaviest per liter of any pack tested (1.30 oz/L)
- Buckles and padding feel bulky compared to premium packs
- Abrasive shoulder straps cause discomfort on longer trips with heavy loads
The Teton Sports 55L Scout is worth including here specifically as a fit-system object lesson. OutdoorGearLab scored it 58/100 and documented that the frame fails to transfer weight to the hipbelt, leaving shoulders sore after heavy loads. It has 7,800+ Amazon reviews at 4.6 stars – meaning it's one of the most purchased packs in the category. The honest use case: loads under 20 lbs on day outings or short overnight trips where frame performance is less critical. For multi-day loads above 25 lbs, the frame architecture is the limitation, and adjustment won't fix it.

Frequently Asked Questions
- How do I measure my torso length for backpack sizing?
- Find your C7 vertebra – the prominent bony bump at the base of your neck – and have a friend measure straight down your spine to the top of your iliac crest (the ridge of your hip bones). That distance is your torso length. Per REI's expert guide, this measurement determines pack size, not your overall height. Most brands size packs across S/M and M/L ranges covering roughly 16–21 inch torsos, so getting this measurement right is the first step to avoiding back pain from a misfit pack.
- What is the correct order to adjust a backpack's straps?
- REI's fitting guide specifies the order: hipbelt first, then shoulder straps, then load lifters, then sternum strap. Fitting out of order produces inaccurate adjustments because each strap affects the others. Always load the pack to 20–25 lbs before fitting – an empty pack adjusts completely differently than a loaded one.
- Why does my hipbelt keep sliding up when I hike?
- A migrating hipbelt usually means the belt shape doesn't match your hip profile, the torso length is too short (causing the pack to lever the belt upward), or the belt lacks enough stiffness for your load. When the belt drifts off the iliac crest, load transfer stops and weight shifts back to your shoulders. This is a fit system failure that adjustment alone can't fully correct – you may need a different pack.
- Do women need a women's-specific backpack?
- Not necessarily, but the engineering differences are real. Women's packs have shoulder straps positioned closer together for narrower shoulder width and hipbelts curved to match proportionally wider hips. Alpenglow Sports notes that when a unisex hipbelt fails to seat correctly on women's iliac crests, load transfers back to the shoulders regardless of adjustment. If you've used a unisex pack that fit the torso chart but still carried poorly, the hipbelt shape is the first thing to investigate.
- What does Osprey's Anti-Gravity (AG) system actually do for fit and comfort?
- Osprey's AG system uses a continuous suspended mesh panel running from the shoulders to the waist, then wrapping around onto the hipbelt. GearX explains this creates an anchoring effect that hugs the pack around the hips rather than simply resting on them. OutdoorGearLab testers described it as feeling like 'the pack is giving me a hug.' The practical effect is that load distributes across the entire back surface simultaneously, reducing pressure points on both shoulders and hips and significantly improving ventilation by creating an air channel between the pack and your back.
- How heavy should my loaded backpack be?
- REI's guideline is that a loaded pack should not exceed 20% of your body weight. For a 150-lb hiker, that's a 30-lb ceiling including the pack itself. This is why pack weight directly affects the fit equation: a 5.2-lb pack like the Deuter Aircontact Core uses more of that budget before you've added any gear, while a 3.0-lb pack like the Granite Gear Blaze 60 leaves more of the allowance for food, water, and shelter.
- What volume backpack do I need for a 3-day hiking trip?
- Both REI and OutdoorGearLab recommend 50–65L for 3–5 day backpacking trips in 3-season conditions. A 50–55L pack is typically sufficient for 3 days. Weekend overnights work with 35–50L. Trips of 5+ days or winter camping with bulkier insulation warrant 65–75L. Volume requirements also depend on how compressible your sleep system and shelter are – ultralight gear lets you run smaller volumes at the same trip length.
- At what point does a budget backpack become a problem?
- OutdoorGearLab's testing of the Teton Sports 55L Scout found the frame fails to transfer weight to the hipbelt effectively, causing shoulder soreness under heavy loads. Their testers observed that 'after a few hours with heavy loads, you can appreciate the value of higher-end suspension designs.' The practical threshold: budget packs are acceptable for loads under 20 lbs on outings under a full day. For multi-day trips with loads above 25 lbs, the frame architecture of budget packs forces weight back onto your shoulders in ways that adjustment cannot fix.
- What should load lifter straps look like when properly adjusted?
- Load lifters – the short straps running from the top of the shoulder strap to the top of the pack frame – should form approximately a 45-degree angle from shoulder to pack, per REI's guide. Too slack and the top of the pack pulls away from your upper back, shifting the center of gravity rearward. Too tight and they create a pressure ridge across the top of your shoulder. This is one of the most under-adjusted components on most hikers' packs.
- Can I fit a backpack properly without going to a gear store?
- Yes, with two measurements and a loaded pack. Measure your torso length (C7 to iliac crest) and hip circumference at the iliac crest, then compare to the manufacturer's sizing chart. Load the pack to 20–25 lbs before adjusting. Follow the sequence: hipbelt on iliac crest first, then shoulder straps, then load lifters to 45 degrees, then sternum strap. REI offers free returns on packs that don't fit, which effectively makes ordering online lower-risk than it sounds.
Related articles


